MTE Relay Server - AWS Usage Guide
Introduction:
The MTE Relay Server is a NodeJS application that decodes and proxies HTTP payloads from client applications encoded by Eclypses MTE Software. The Eclypses MTE is a compiled software library combining quantum-resistant algorithms with proprietary, patented techniques to encode data. A common use case for the MTE is to import Eclypses' client-side NPM package into a web application to encode data-in-transit and the MTE Relay Server to pair, decode, and proxy the request to the intended recipient. The MTE Relay has been used in payment gateways to secure the creation of payments, as a VPN replacement for analytics dashboards, and orchestrated in highly-available enterprise environments.
Introductory Video

Customer Deployment
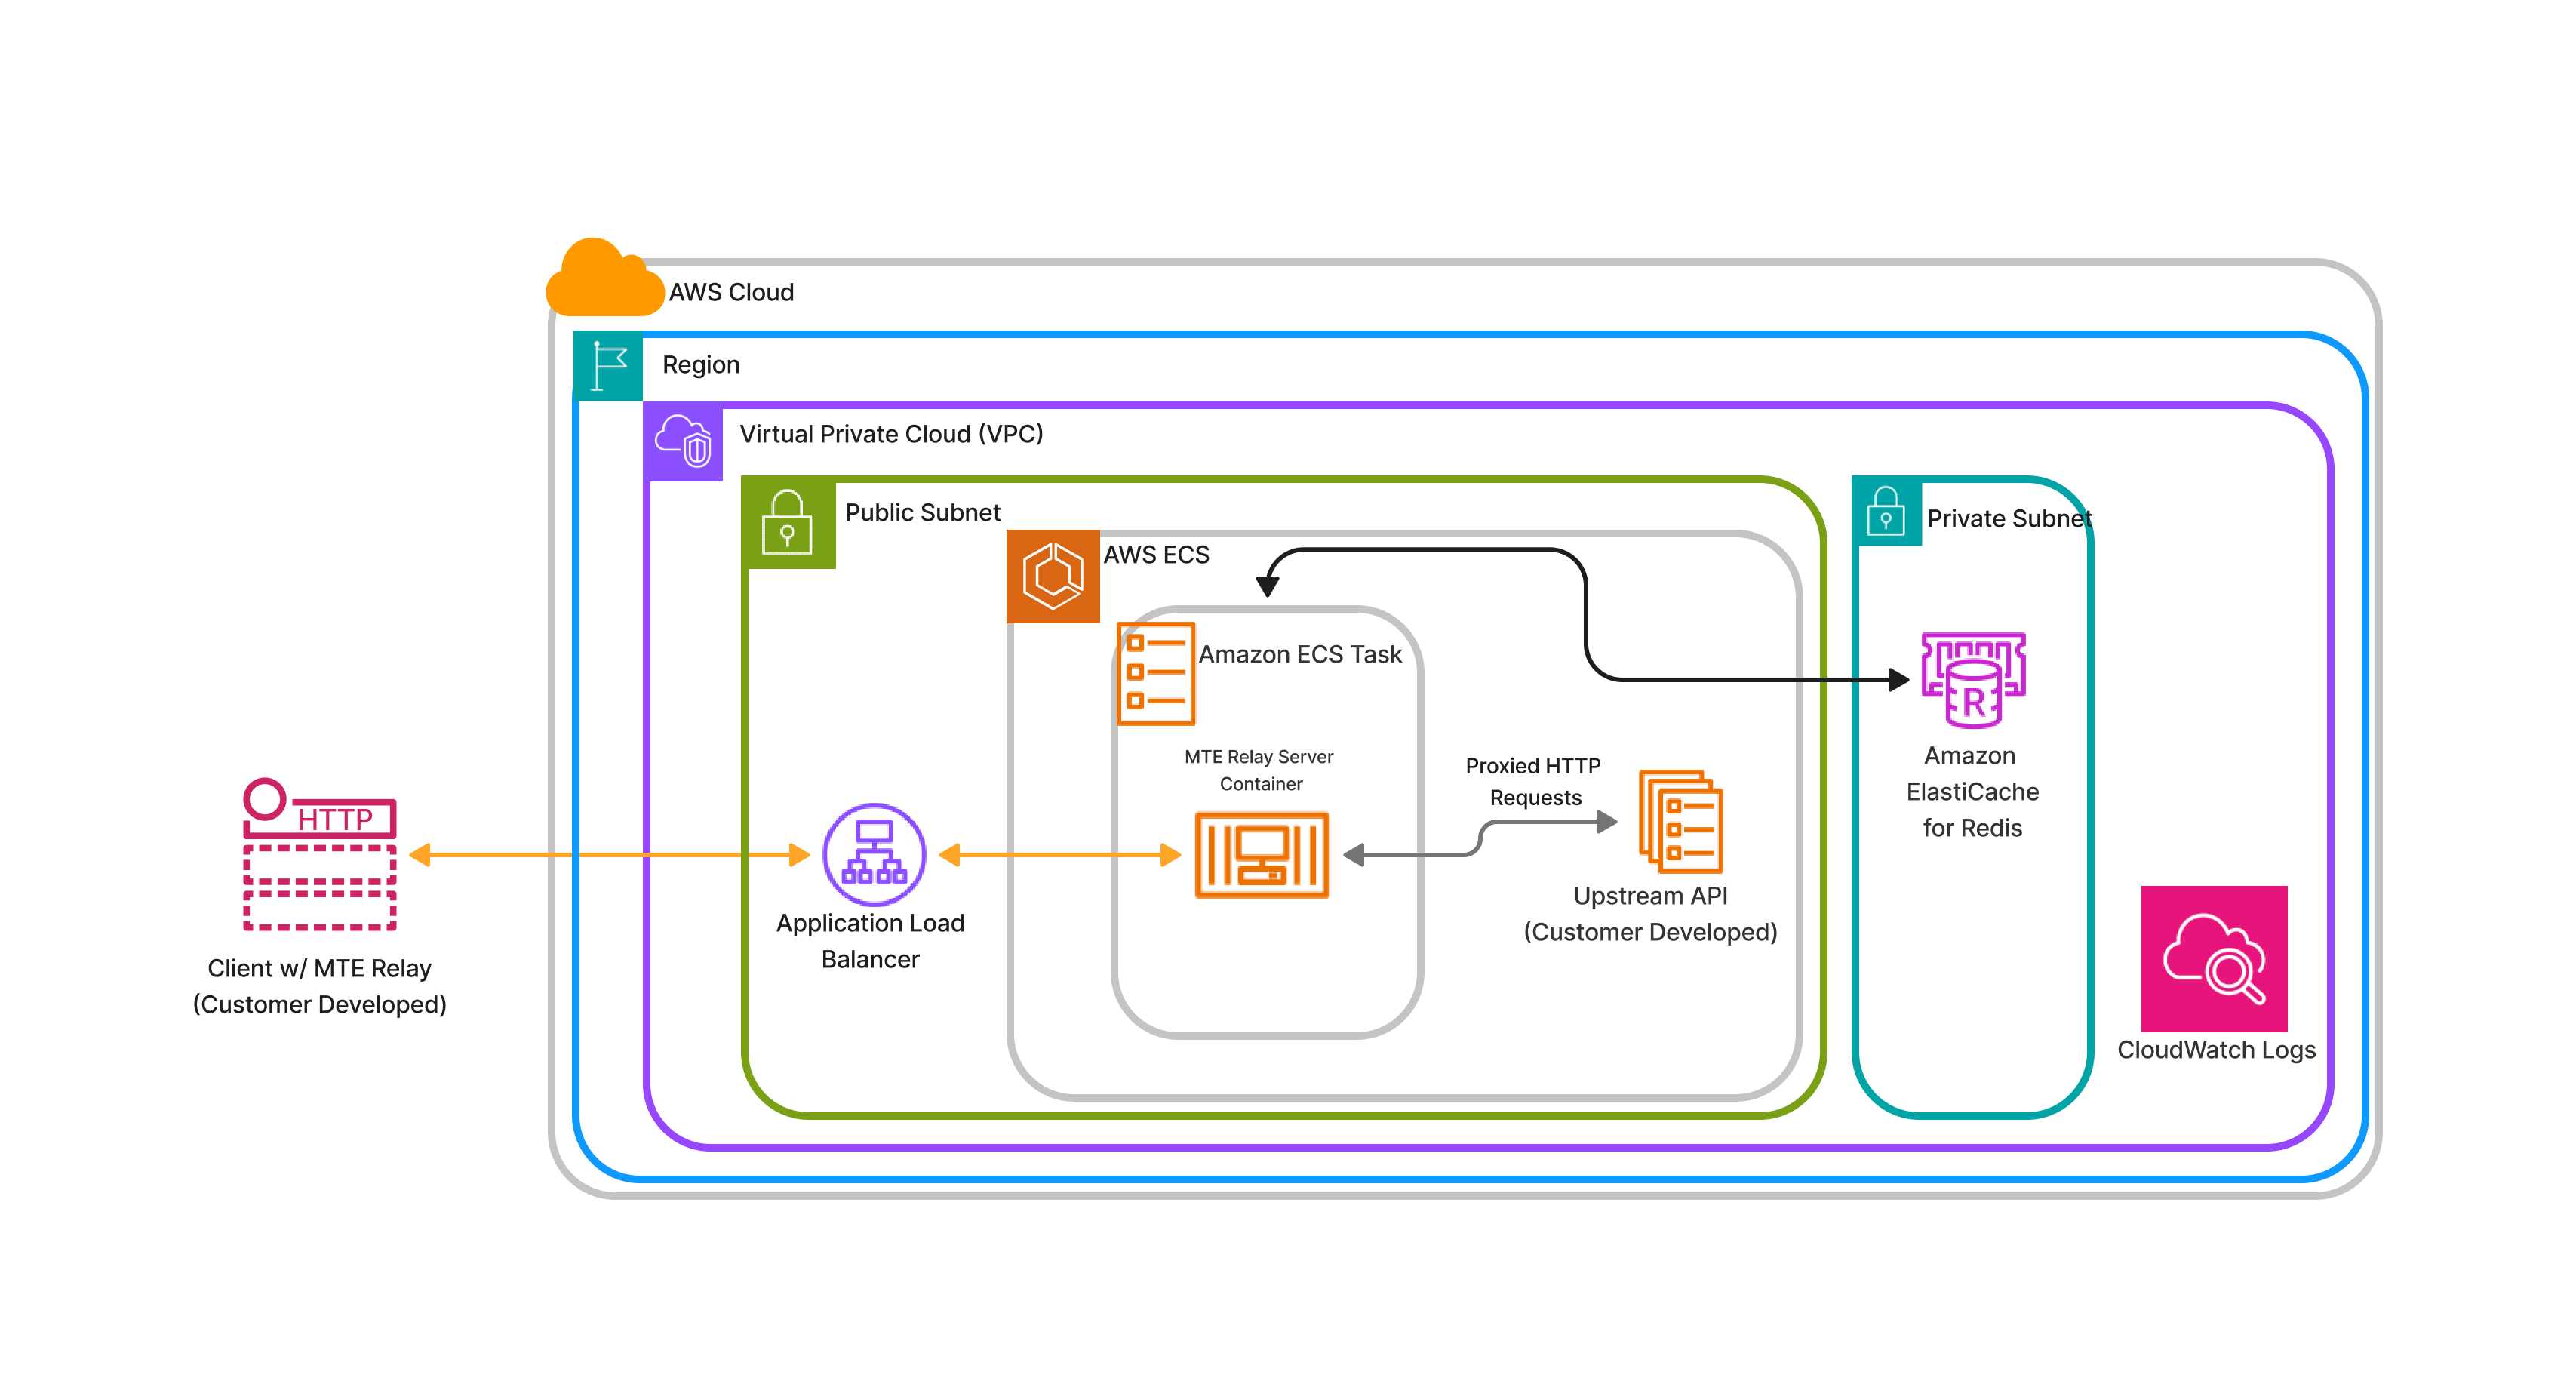
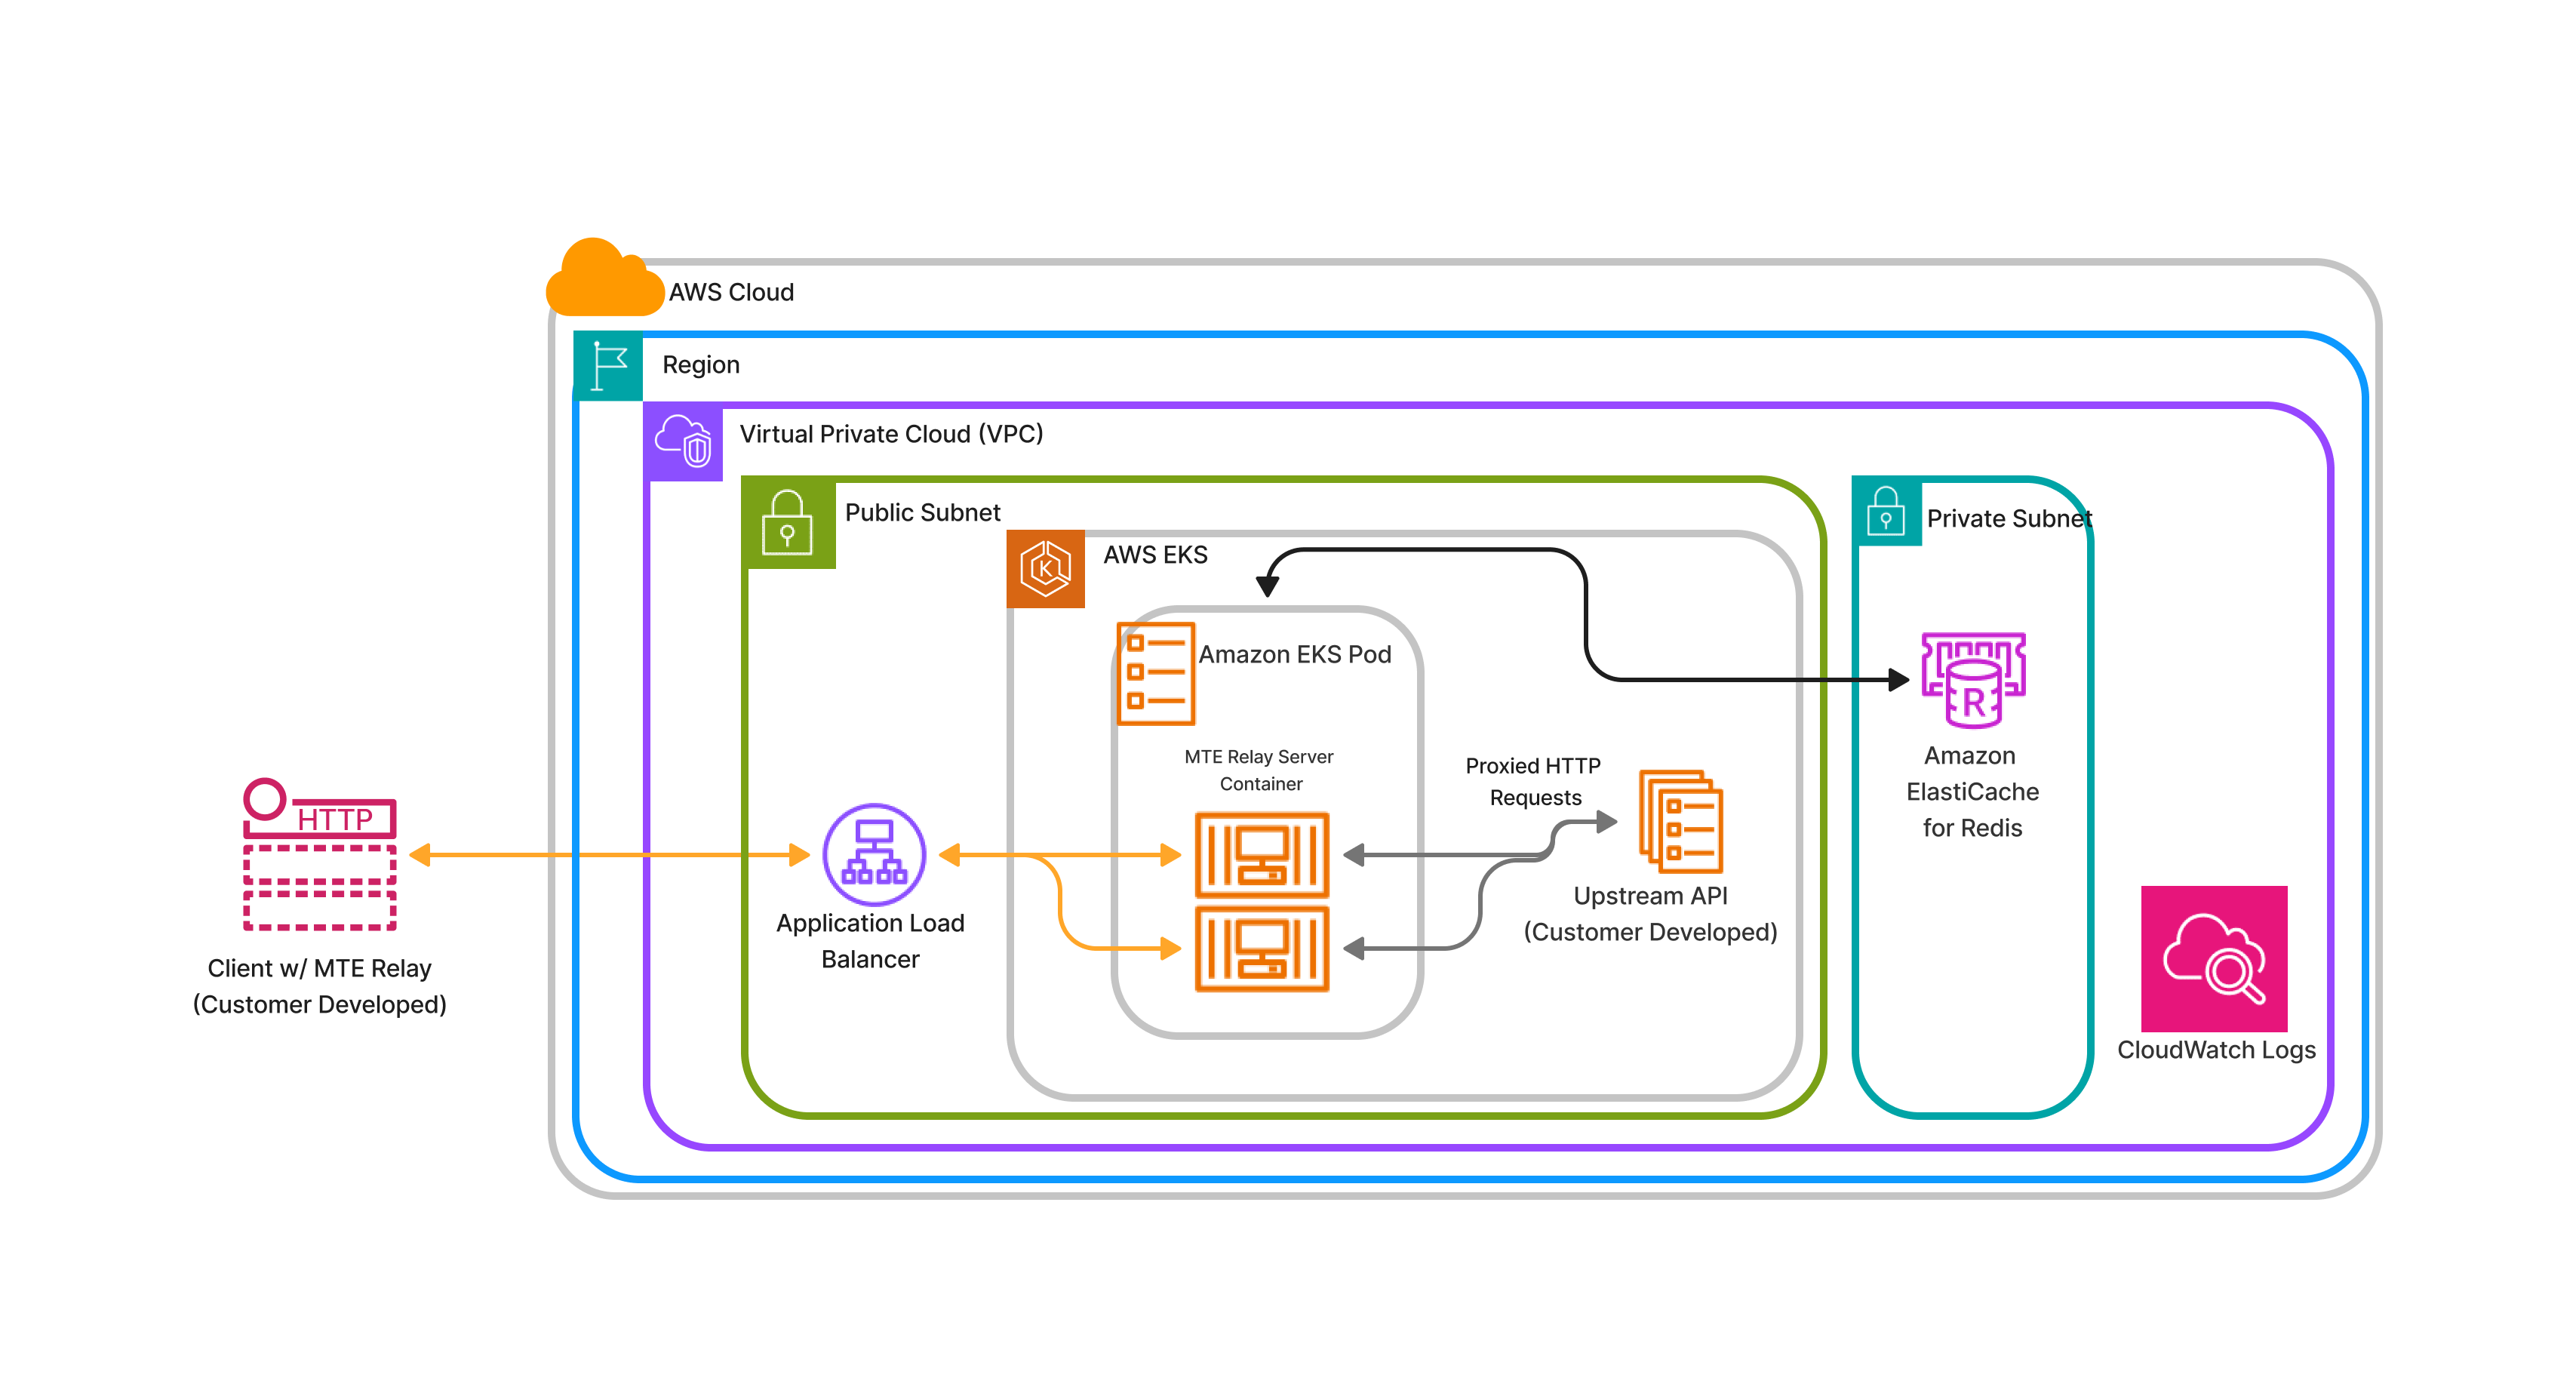
The MTE Relay Server is typically used to decode HTTP Requests from a browser-based web application (or mobile WebView) and proxy the decoded request to the intended API. In AWS, the MTE Relay Server container can be orchestrated as a single or multi-container in an ECS (Elastic Container Service) Task. Orchestration and setup of the container service could take up to 1-2 days. While it is possible to deploy this workload in an EKS (Elastic Kubernetes Service) Cluster, this document will focus on a typical deployment in AWS ECS.
Typical Customer Deployment
In an ideal situation, a customer will already have (or plan to create):
- A web application with a JavaScript front-end or a mobile application using WebView.
- A RESTful Web API back-end.

When completed, the following services and resources will be set up:
| Service | Required | Purpose |
|---|---|---|
| AWS ECS | True | Container Orchestration |
| AWS ElastiCache | True | MTE State Management |
| AWS CloudWatch | True | Logging |
| AWS VPC | True | Virtual Private Cloud |
| Elastic Load Balancer | True | Required if orchestrating multiple containers |
| AWS Secrets Manager | False | Recommended for Environment Variables |
| Resource | Required | Purpose |
|---|---|---|
| Eclypses MTE Relay Server container(s) | True | Purchased from the AWS Marketplace |
| ElastiCache for Redis | True | ElastiCache |
| Application Load Balancer | True | Recommended - even for a single container workflow |
| ECS Task | True | Orchestration |
Deployment Options:
- The default deployment: Multiple AZ, Single Region
- For Multi-AZ or Multi-Region deployments, the MTE Relay Container is a stateful service and will create unique, one-to-one MTE States with individual client-side browser/application sessions. As such, it is important to understand that to deploy multi-region configurations, a single ElastiCache service must be accessible to all regions that might be processing HTTP requests from a single client session.
Supported Regions:
Not currently supported in:
- GovCloud
- Middle East (Bahrain)
- Middle East (UAE)
- China
Port Mappings
- Container runs on port 8080 for HTTP traffic
Client-Side Implementation:
MTE Relay Server is intended for use with your client-side application configured to use MTE Relay Client. As a result, a client can pair with the server and send MTE-encoded payloads. Without a compatible client-side application, this product has extremely limited utility. The MTE Relay server provides access to the client JavaScript module required to secure/unsecure data on the client. Once the server is set up, the client JS code is available at the route /public/mte-relay-browser.js.
Reference the setup and usage instructions here.
Client-Side implementation is typically less than one day of work but may take longer in more complex DevOps pipelines.
Prerequisites and Requirements
Technical
The following elements are previously required for a successful deployment:
-
An application (or planned application) that communicates with a Web API using HTTP Requests
- Ideally, this is an application the purchaser owns or can import packages and add/change custom code.
Skills or Specialized Knowledge
- Familiarity with AWS ECS (or EKS orchestration)
- General familiarity with AWS Services like ElastiCache
- Ability to write/edit front-end client application code. JavaScript knowledge is ideal.
Configuration
The customer is required to create the following keys. It is recommended that these keys be stored in AWS Secrets Manager.
Configuration Video

The MTE Relay is configurable using the following environment variables :
Required Configuration Variables:
UPSTREAM- Required
- The upstream application IP address, ingress, or URL that inbound requests will be proxied to.
CORS_ORIGINS- Required
- A comma-separated list of URLs that will be allowed to make cross-origin requests to the server.
CLIENT_ID_SECRET- Required
- A secret that will be used to sign the x-mte-client-id header. A 32+ character string is recommended.
- Note: This will allow you to personalize your client/server relationship. It is required to validate the sender.
AWS_REGION- Required
- The region you are running your Relay server in. Example:
us-east-1
REDIS_URL- Strongly Recommended in Production Environments
- The entry point to your Redis ElastiCache cluster. If null, the container will use internal memory. In load-balanced workflows, a common cache location is required to maintain a paired relationship with the upstream API Relay.
Optional Configuration Variables:
The following configuration variables have default values. If the customer does choose to create the following keys, it is recommended that these keys be stored in AWS Secrets Manager.
PORT- The port that the server will listen on.
- Default:
8080. - Note: If this value is changed, make sure it is also changed in your application load balancer.
DEBUG- A flag that enables debug logging.
- Default:
false
PASS_THROUGH_ROUTES- A list of routes that will be passed through to the upstream application without being MTE encoded/decoded.
- example: "/some_route_that_is_not_secret"
MTE_ROUTES- A list of routes that will be MTE encoded/decoded. If this optional property is included, only the routes listed will be MTE encoded/decoded, and any routes not listed here or in
PASS_THROUGH_ROUTESwill 404. If this optional property is not included, all routes not listed inPASSTHROUGH_ROUTESwill be MTE encoded/decoded.
- A list of routes that will be MTE encoded/decoded. If this optional property is included, only the routes listed will be MTE encoded/decoded, and any routes not listed here or in
CORS_METHODS- A list of HTTP methods that will be allowed to make cross-origin requests to the server.
- Default:
GET, POST, PUT, DELETE. - Note:
OPTIONSandHEADare always allowed.
HEADERS- An object of headers that will be added to all request/responses.
MAX_POOL_SIZE- The number of encoder objects and decoder objects held in a pool. A larger pool will consume more memory, but it will also handle more traffic more quickly. This number is applied to all four pools; the MTE Encoder, MTE Decoder, MKE Encoder, and MKE Decoder pools.
- Default:
25
YAML Configuration Examples
AWS Task Definition Parameters
Minimal Configuration Example
upstream: https://api.my-company.com
clientIdSecret: 2DkV4DDabehO8cifDktdF9elKJL0CKrk
corsOrigins:
  - https://www.my-company.com
  - https://dashboard.my-company.com
redisURL: redis://10.0.1.230:6379
Full Configuration Example
upstream: https://api.my-company.com
clientIdSecret: 2DkV4DDabehO8cifDktdF9elKJL0CKrk
corsOrigins:
  - https://www.my-company.com
  - https://dashboard.my-company.com
redisURL: redis://10.0.1.230:6379
port: 3000
debug: true
passThroughRoutes:
  - /health
  - /version
mteRoutes:
  - /api/v1/*
  - /api/v2/*
corsMethods:
  - GET
  - POST
  - DELETE
headers:
  x-service-name: mte-relay
maxPoolSize: 10
ENV Configuration Examples
Minimal Configuration Example�
UPSTREAM='https://api.my-company.com'
CLIENT_ID_SECRET='2DkV4DDabehO8cifDktdF9elKJL0CKrk'
CORS_ORIGINS='https://www.my-company.com,https://dashboard.my-company.com'
REDIS_URL='redis://10.0.1.230:6379'
Full Configuration Example
UPSTREAM='https://api.my-company.com'
CLIENT_ID_SECRET='2DkV4DDabehO8cifDktdF9elKJL0CKrk'
CORS_ORIGINS='https://www.my-company.com,https://dashboard.my-company.com'
REDIS_URL='redis://10.0.1.230:6379'
PORT=3000
DEBUG=true
PASS_THROUGH_ROUTES='/health,/version'
MTE_ROUTES='/api/v1/*,/api/v2/*'
CORS_METHODS='GET,POST,DELETE'
HEADERS='{"x-service-name":"mte-relay"}'
MAX_POOL_SIZE=10
Database Credentials:
None
Key/Variable Rotation Recommendations:
It is not necessary to rotate any keys in the Environment Variables section as they do not have any cryptographic value. However, it would good practice to rotate the "CLIENT_ID_SECRET" every 90 days (about 3 months) as recommended by many modern best-practices.
Architecture Diagrams
Default Deployment
ECS Deployment
Alternative Deployment
EKS Deployment – Multiple Load- Balanced Containers
*This process is not described in this document
Security
The MTE Relay does not require AWS account root privilege for deployment or operation. The container only facilitates the data as it moves from client to server and does not store any sensitive data.
AWS Identity and Access Management (IAM) Roles:
In Elastic Container Services (ECS), create a new Task Definition.
Give your task definition appropriate roles:
-
ecsTaskExecutionRole
-
Note: The task must have access to the
AWSMarketplaceMeteringRegisterUsagerole.
For dependencies:
- AWSServiceRoleForElastiCache: Permission to read/write from ElastiCache instance
- AWSServiceRoleForCloudWatch: Permission to write to AWS CloudWatch log service
VPC (Virtual Private Cloud)
While traffic is protected between the client application and MTE Relay Server, the traffic is not encoded while it is proxied to the upstream service. The MTE Relay container should be deployed in the same VPC as the upstream servers so that proxied traffic can remain internal only. See the architecture diagrams for a visual representation.
Costs
The MTE Relay container is a usage-based model based on Cost/Unit/Hr, where a unit = AWS ECS Task. See the marketplace listing for costs.
Billable Services
| Service | Required | Purpose |
|---|---|---|
| AWS ECS | True | Container Orchestration |
| AWS ElastiCache | True | MTE State Management |
| AWS CloudWatch | True | Logging |
| AWS VPC | True | Recommended |
| Elastic Load Balancer | True | Required if orchestrating multiple containers |
| AWS Secrets Manager | False | Recommended for Environment Variables |
Sizing
ECS
The Relay Server can be load-balanced as needed and configured for autoscaling. There are no size requirements.
- The MTE Relay Server Container workload is subject to ECS Service Limits.
Deployment Assets
VPC Setup
It is not necessary to create a dedicated VPC for this workflow. Ideally, your MTE Relay Server is run in the same VPC as your upstream API.
AWS ElastiCache Redis Setup
ElastiCache Security Group Settings
- Create a new security group.
- Give your security group a name and description.
MTERelayElastiCacheSG- Allow traffic from MTE Relay ECS service.
- Add a new inbound rule.
- Type: All TCP
- Source: Custom
- Click in the search box, and scroll down to select your security group
MteRelayServiceSG.
- Click in the search box, and scroll down to select your security group
- Description: Allow traffic from MTE Relay ECS Service.
- If an outbound rule does not already exist to allow all outbound traffic, create one.
- Type: All Traffic
- Destination: Anywhere IPv4
- Click Create Security Group
ElastiCache Setup
- Create ElastiCache cluster
- Select Redis Interface
- Subject to quota limits
- The minimum/maximum defaults should be sufficient
- Assign your Security Group that allows traffic on port
6379and6380from your MTE Relay Server ECS instance.- Select your newly created cache, then click Modify from the top right.
- Scroll down to Security, then under Security Groups click Manage
- Remove the default security group and add the security group
MTERelayElastiCacheSG - Save these changes.
- Configure ElastiCache for Redis to the private subnet
Setting up Elastic Container Service (ECS)
ECS will run the MTE Relay container and dynamically scale it when required. To do this, create a task definition to define what a single MTE Relay container looks like, create a Service to manage running the containers, and finally create an ECS Cluster for your service to run in.
Server Setup Video

Create an ECS Cluster
- Navigate to ECS, then click "Clusters" from the left side menu.
- Click "Create cluster"
- Enter a cluster name.
- Select
AWS Fargate (serverless)as the infrastructure. - Click Create.
AWS ECS Setup – Task Definition
Infrastructure Requirements
- From the left side menu, select Task Definitions
- Click to Create new task definition.
- Create a Task Definition family name;
- Select Launch Type of
AWS Fargate - Operating System
Linux x86_64 - Select
1vCPUand2GB Memory - Task Roles should be
ecsTaskExecutionRole
Task Definition Directions
- Subscribe to the Container Product from the marketplace
- Create new Task Definition called MTE Relay Server
- Choose ECS Instance launch type; AWS Fargate
- Choose CPU and Memory. There is no minimum requirement, but
1 CPUand2GB memoryis recommended. - Give your task definition appropriate roles:
ecsTaskExecutionRole- Note: The task must have access to the
AWSMarketplaceMeteringRegisterUsagerole.
- Provide the MTE Relay Docker image URI and give your container a name.
- It is an essential container
- Port Mappings
- Container runs on port 8080 for HTTP traffic
- Provide Required Environment Variables
- Additional environment variables can be set. Please see MTE Relay Server Docs for more info.
- Select to export logs to AWS Cloud Watch
- Create a new CloudWatch log group, and select the same region your MTE Relay Server is running in.
- Subject to CloudWatch limits
- Save Task Definition
ECS Service Setup
After creating the MTE Relay Task Definition, you can create a new ECS service that utilizes that task definition.
- Select the MTE Relay Task Definition and click Deploy > Create Service
- Leave "Compute Configuration" defaults.
- Under Deployment Configuration, name your service MTE Relay Service
- For the number of desired tasks, select how many instances of MTE Relay you would like.
- Minimum is 1, and recommended is 2 or more.
- Under the networking sections, ensure you are launching MTE Relay in the same VPC as your upstream service.
- Select, or create a new, service group that will allow traffic from your load balancer.
- Create a new load balancer for this service.
- Set any additional configuration regarding service scaling or tags. These are optional.
- Save and create the new service.
ECS Cluster Security Group
- Create a new security group.
- Give your security group a name and description
MteRelayServiceSG- Allow Traffic to MTE Relay Service
- Add a new inbound rule.
- Type: All TCP
- Source: Custom
- Click in the search box, and scroll down to select your security group for web traffic to your load balancer.
- Description: Allow traffic from load balancer.
- If an outbound rule does not already exist to allow all outbound traffic, create one.
- Type: All Traffic
- Destination: Anywhere IPv4
- Click Create Security Group
Load Balancer Settings
- Navigate to the Elastic Compute Cloud (EC2) service.
- From the menu on the left, scroll down to Network & Security > Security Groups
- Click Create Security Group to create a new security group.
- Give your security group a name and description.
PublicWebTrafficSG- Allow public web traffic on ports 80 and 443
- Add a new Inbound rule.
- Custom TCP
- Port 80
- Source from Anywhere-IPv4
- Description: Allow incoming traffic on port 80.
- Create a second inbound rule for traffic on port 443.
- If an outbound rule does not already exist to allow all outbound traffic, create one.
- Type: All Traffic
- Destination: Anywhere IPv4
- Click Create Security Group
Service Configuration
- From the left side menu, click Clusters, then click the name of your newly create cluster
- Halfway down the page, ensure the Services tab is selected, then click Create
Environment
All default options are fine.
- Capacity Provider is Fargate
- Weight is 1
- Version is latest.
Deployment Configuration
- Use the Family dropdown to select the Family Name you create in your task definition.
- Select the latest revision of that task definition
- Name your service
- Desired tasks: 1 is ok to test. If you have more traffic, you may choose to run 2 or more instances of MTE Relay Server.
Networking
- Select your desired VPC, if you have more than one.
- Choose your subnets. Select all if you're not sure.
- Under security groups, remove any default groups, and add the security group MteRelayServiceSG
EKS Setup
Deploying MTE Relay on EKS is very simple, assuming you have already configured your kubectl to connect to your EKS cluster.
Deployment File:
Copy this deployment file to your machine, and update the values for image and the environment variables.
# deployment.yaml

apiVersion: apps/v1
kind: Deployment
metadata:
  name: aws-mte-relay-deployment
spec:
  replicas: 1
  selector:
    matchLabels:
      app: aws-mte-relay
  template:
    metadata:
      labels:
        app: aws-mte-relay
    spec:
      containers:
        - name: aws-mte-relay
          image: <CONTAINER_IMG>
          ports:
            - containerPort: 8080
          env:
            - name: CLIENT_ID_SECRET
              value: <YOUR CLIENT ID SECRET HERE>
            - name: CORS_ORIGINS
              value: <YOUR CORS ORIGINS HERE>
            - name: UPSTREAM
              value: <UPSTREAM VALUE HERE>
            - name: AWS_REGION
              value: <AWS REGION HERE>
To release the deployment, run the command: kubectl apply -f deployment.yaml.
Application Load Balancer
Expose a service in your EKS cluster to receive incoming traffic and direct it to your Relay server.
# service.yaml

apiVersion: v1
kind: Service
metadata:
  name: aws-mte-relay-service
spec:
  type: LoadBalancer
  selector:
    app: aws-mte-relay
  ports:
    - protocol: TCP
      port: 80
      targetPort: 8080
Run the command: kubectl apply -f service.yaml
You may then run the command kubectl get services to get information about the newly created load balancer.
Remove deployment and service
If you need to remove the deployment and service you may run the command: kubectl delete -f deployment.yaml && kubectl delete -f service.yaml
MTE Relay Client-Side Setup
Eclypses provides several packages and techniques for client applications to interface with MTE Relay server:
- Create your own Package
- Native JavaScript Package
- Native Android Package
- Native iOS Package
- Locust Python Package
Testing
Once the Relay Server is configured:
- Monitor logs in CloudWatch – check for initialization errors.
- On successful startup, you should see two logs
- MTE instantiated successfully.
- Server listening at http://[0.0.0.0]:8080
- On successful startup, you should see two logs
- To test that the API Service is active and running, submit an HTTPGet request to the echo route:
- curl 'https://[your_domain]/api/mte-echo/test'
- Successful response:
{
  "echo":"test",
  "time"[UTC datetime]
} - Add "relay-test.eclypses.com" to "CORS" comma-separated environment variable
- Navigate to the Eclypses testing application at: https://relay-test.eclypses.com
- Input your Relay URL in the "Relay Server URL" textbox
- Test the "Login" demo (note: this is a simple HTTPPost submission - not a real login!)
- Success Scenario
- Failure Scenario
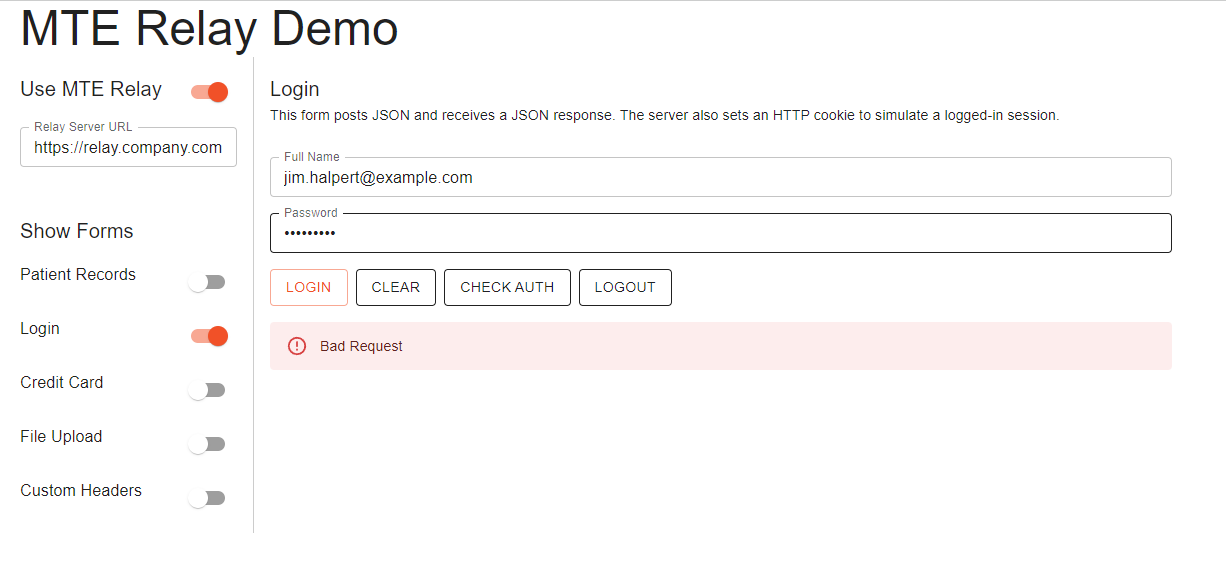
- Success Scenario
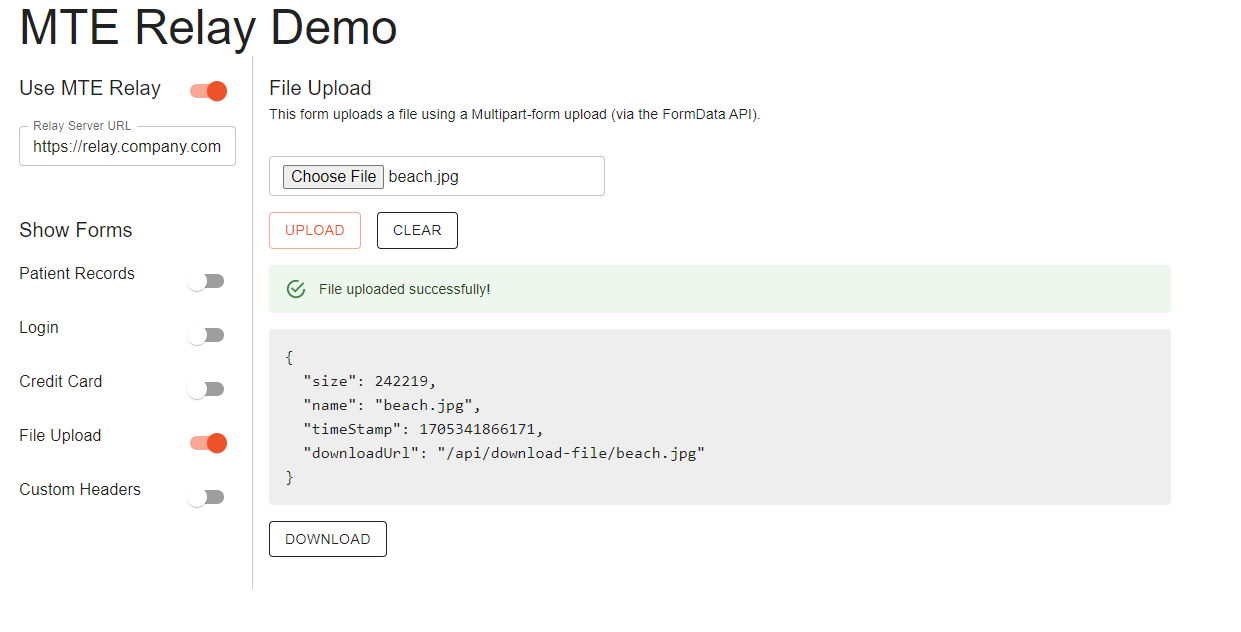
- Test the File Upload
- Success Scenario
- Error Scenario
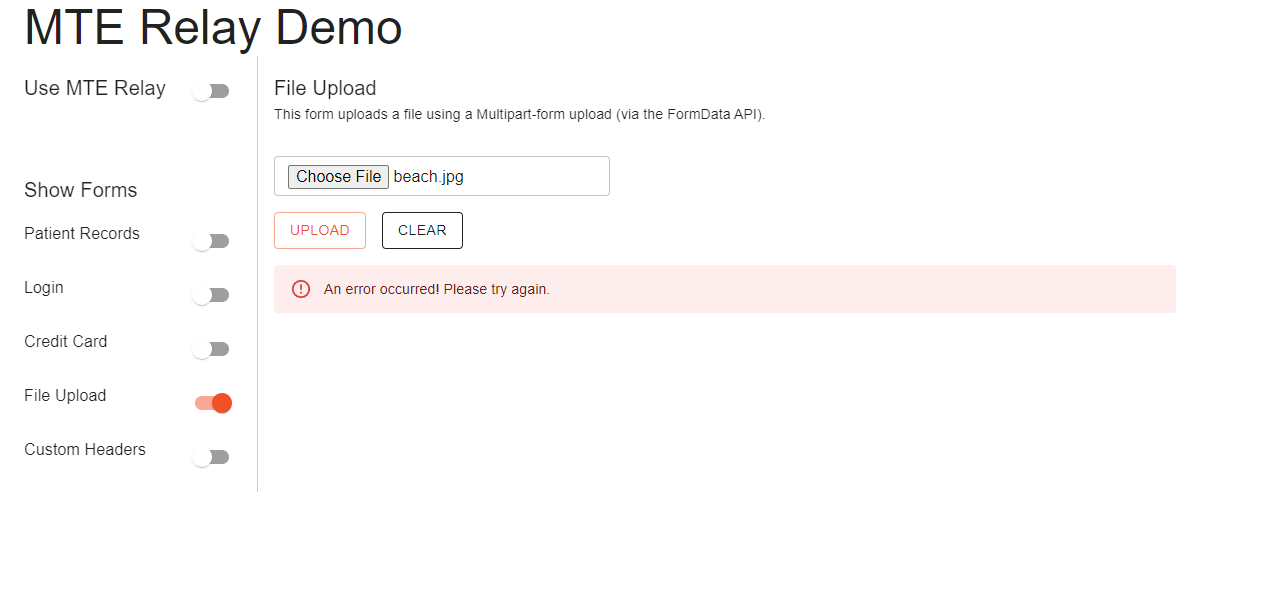
- Success Scenario
Troubleshooting
Most problems can be determined by consulting the logs in AWS CloudWatch. Some common problems that might occur are:
- Invalid Configuration
- Network misconfiguration
Some specific error examples include:
- I cannot reach my relay server.
- Double check your Security Group allows traffic from your load balancer.
- Check CloudWatch
- Server exits with a
ZodError- This is a config validation error. Look at the "path" property to determine which of the required Environment Variables you did not set. For example, if the path property shows "upstream," then you forgot to set the environment variable "UPSTREAM."
- Server cannot reach ElastiCache.
- Check that ElastiCache is started in same VPC.
- Check that ElastiCache security group allows traffic from MTE Relay ECS instance.
- If using credentials, check that credentials are correct.
MTE Relay Server includes a Debug flag, which you can enable by setting the environment variable "DEBUG" to true. This will enable additional logging that you can review in CloudWatch to determine the source of any issues.
Health Check
For short and long-term health – monitor logs in the AWS CloudWatch service.
KPI's for a Healthy Relay Container
Here are some recommendations for Cloudwatch Roundtrip Metrics. The following metrics were derived from running our locust program against a single AWS MTE Relay Container running in ECS.
If you find that you are exceeding any of the following metrics, we recommend orchestrating another container to share the load.
| Distribution | Round-Trip Latency (ms) | % Latency Increase (compared w/ no Relay) |
|---|---|---|
| p50 | 246 | 390% |
| p90 | 533 | 627% |
| p99 | 2200 | 740% |
| HTTP Requests Per Second |
|---|
| 200 |
Echo Route
The Echo route can be called by an automated system to determine if the service is still running. To test that the API Service is active and running, submit an HTTPGet request to the echo route:
curl 'https://[your\_domain]/api/mte-echo/test'
Successful response:
  {
    "echo":"test",
    "time"[UTC datetime]
  }
Routine Maintenance
Patches/Updates
Updated images are distributed through the marketplace.
Service Limits
- ECS
- The MTE Relay Server Container workload is subject to ECS Service Limits.
- ElastiCache
- CloudWatch
- ELB (Elastic Load Balancer)
- The MTE Relay Server Container workload is subject to ELB Service Limits:
Rotation of Secrets
Rotate the CLIENT_ID_SECRETevery 90 days (about 3 months) as recommended by many modern best-practices.
Emergency Maintenance
Handling Fault Conditions
Tips for solving error states:
- Review all tips from Trouble Shooting section above.
- Check ECS CloudWatch Logs for more information
- Configuration mismatch
- Double-check environment variables for errors
How to recover the software
The MTE Relay Container ECS task can be relaunched. While current client sessions may be affected, the client-side package should seamlessly manage the re-pairing process with the MTE Relay Server and the end-user should not be affected.
Support
The Eclypses support center is available to assist with inquiries about our products from 8:00 am to 8:00 pm MST, Monday through Friday, excluding Eclypses holidays. Our committed team of expert developer support representatives handles all incoming questions directed to the following email address: customer_support@eclypses.com