MTE Relay Server on Azure
Introduction:
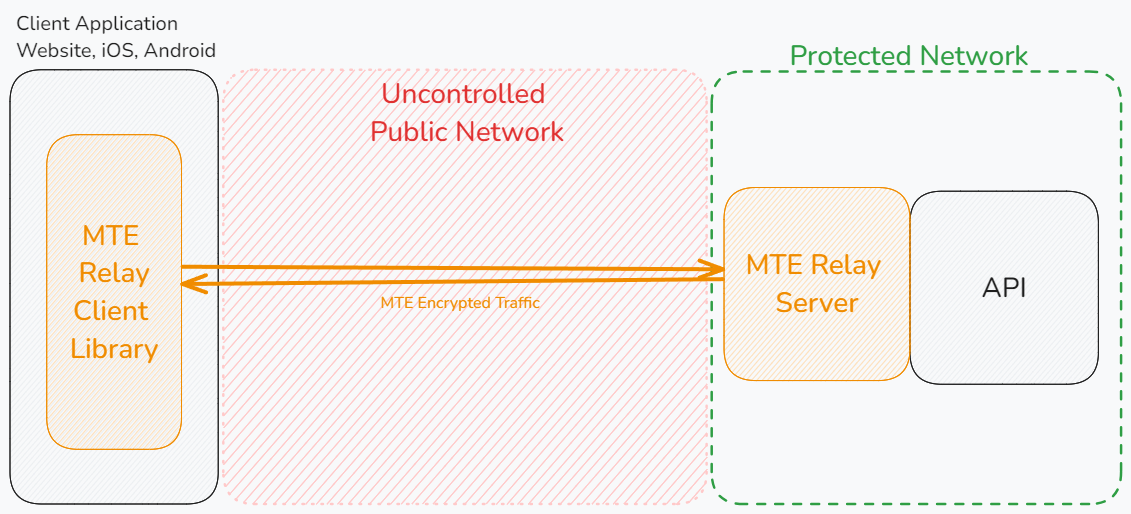
MTE Relay Server is an end-to-end encryption system that protects all network requests with next-generation application data security. MTE Relay Server acts as a proxy-server that sits in front of your normal backend, and communicates with an MTE Relay Client, encoding and decoding all network traffic. MTE Relay Server is highly customizable and can be configured to integrate with a number of other services through the use of custom adapters.
Customer Deployment
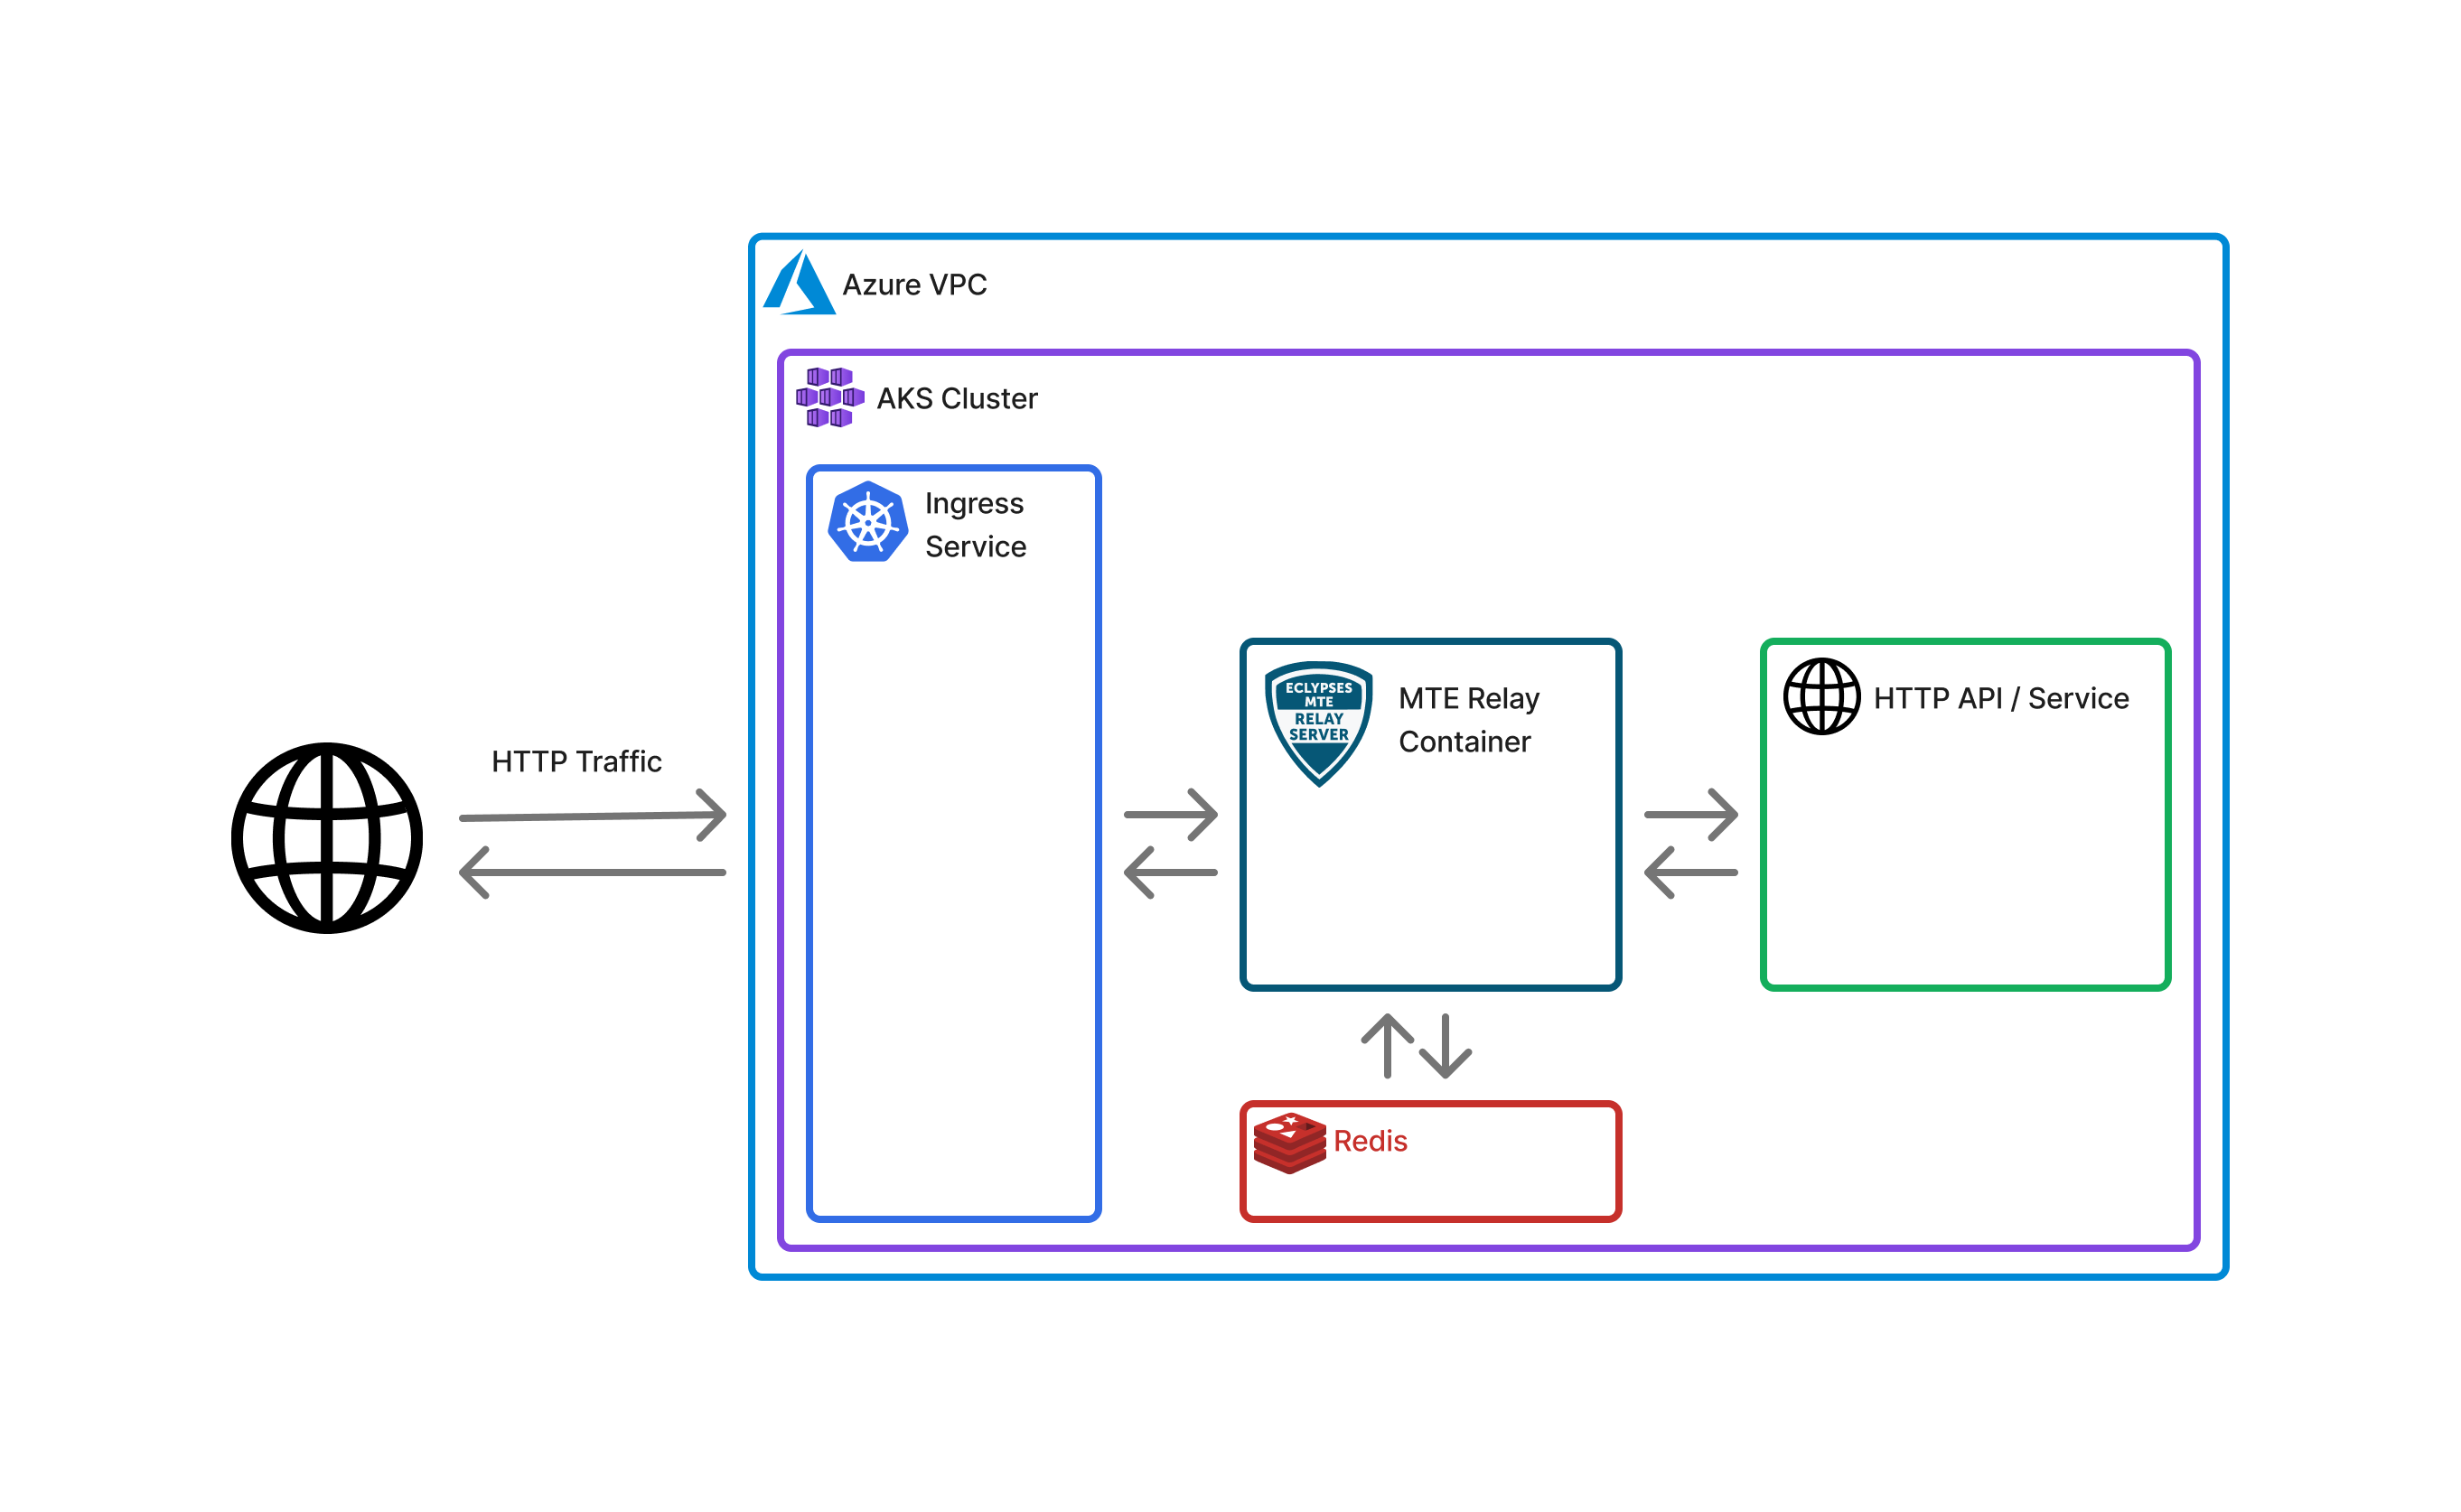
The MTE Relay Server is typically used to decode HTTP Requests from a browser-based web application (or mobile WebView) and proxy the decoded request to the intended API. In Azure, the MTE Relay Server container can be orchestrated as a single or multi-container in an AKS cluster. Orchestration and setup of the container service could take up to 1-2 days.
Typical Customer Deployment
In an ideal situation, a customer will already have (or plan to create):
- A web application with a JavaScript front-end or a mobile application using WebView.
- A RESTful Web API back-end.

Client-Side Implementation:
MTE Relay Server is intended for use with your client-side application configured to use MTE Relay Client. As a result, the client can pair with the server and send MTE-encoded payloads. The MTE Relay server provides access to the client JavaScript module required to secure/unsecure data on the client. Once the server is set up, the client JS code is available at the route /public/mte-relay-browser.js.
Reference the setup and usage instructions here.
Client-Side implementation is typically less than one day of work but may take longer in more complex DevOps pipelines.
Prerequisites and Requirements
Technical
The following elements are previously required for a successful deployment:
-
An application (or planned application) that communicates with a Web API using HTTP Requests
- Ideally, this is an application the purchaser owns or can import packages and add/change custom code.
Skills or Specialized Knowledge
- Familiarity with Azure AKS and Kubernetes
Required Environment Variables:
UPSTREAM- Required
- The upstream application IP address, ingress, or URL that inbound requests will be proxied to.
CORS_ORIGINS- Required
- A comma-separated list of URLs that will be allowed to make cross-origin requests to the server.
CLIENT_ID_SECRET- Required
- A secret that will be used to sign the x-mte-client-id header. A 32+ character string is recommended.
- Note: This will allow you to personalize your client/server relationship. It is required to validate the sender.
REDIS_URL- Strongly Recommended in Production Environments
- A connection string to a Redis instance. If null, the container will use internal memory. In load-balanced workflows, a common cache location is required.
Optional Environment Variables:
PORT- The port that the server will listen on.
- Default:
8080. - Note: If this value is changed, make sure it is also changed in your application load balancer.
DEBUG- A flag that enables debug logging.
- Default:
false
PASS_THROUGH_ROUTES- A list of routes that will be passed through to the upstream application without being MTE encoded/decoded.
- example: "/some_route_that_is_not_secret"
MTE_ROUTES- A list of routes that will be MTE encoded/decoded. If this optional property is included, only the routes listed will be MTE encoded/decoded, and any routes not listed here or in
PASS_THROUGH_ROUTESwill 404. If this optional property is not included, all routes not listed inPASSTHROUGH_ROUTESwill be MTE encoded/decoded.
- A list of routes that will be MTE encoded/decoded. If this optional property is included, only the routes listed will be MTE encoded/decoded, and any routes not listed here or in
CORS_METHODS- A list of HTTP methods that will be allowed to make cross-origin requests to the server.
- Default:
GET, POST, PUT, DELETE. - Note:
OPTIONSandHEADare always allowed.
HEADERS- A JSON representation of headers that will be added to all request/responses.
Minimal Configuration Example
UPSTREAM='https://api.my-company.com'
CLIENT_ID_SECRET='2DkV4DDabehO8cifDktdF9elKJL0CKrk'
CORS_ORIGINS='https://www.my-company.com,https://dashboard.my-company.com'
REDIS_URL='redis://10.0.1.230:6379'
Full Configuration Example
UPSTREAM='https://api.my-company.com'
CLIENT_ID_SECRET='2DkV4DDabehO8cifDktdF9elKJL0CKrk'
CORS_ORIGINS='https://www.my-company.com,https://dashboard.my-company.com'
REDIS_URL='redis://10.0.1.230:6379'
PORT=3000
DEBUG=true
PASS_THROUGH_ROUTES='/health,/version'
MTE_ROUTES='/api/v1/*,/api/v2/*'
CORS_METHODS='GET,POST,DELETE'
HEADERS='{"x-service-name":"mte-relay"}'
MAX_POOL_SIZE=10
Architecture Diagrams
Default Deployment

Security
The MTE Relay does not require Azure account root privilege for deployment or operation. The container only facilitates the data as it moves from client to server and does not store any sensitive data.
AKS Setup
Deploying MTE Relay on AKS is very simple, assuming you have already configured your kubectl to connect to your AKS cluster.
Deployment File:
Copy this deployment file to your machine, and update the values for image and the environment variables.
# deployment.yaml

apiVersion: apps/v1
kind: Deployment
metadata:
  name: azure-mte-relay-deployment
spec:
  replicas: 1
  selector:
    matchLabels:
      app: azure-mte-relay
  template:
    metadata:
      labels:
        app: azure-mte-relay
    spec:
      containers:
        - name: azure-mte-relay
          image: <CONTAINER_IMG>
          ports:
            - containerPort: 8080
          env:
            - name: CLIENT_ID_SECRET
              value: <YOUR CLIENT ID SECRET HERE>
            - name: CORS_ORIGINS
              value: <YOUR CORS ORIGINS HERE>
            - name: UPSTREAM
              value: <UPSTREAM VALUE HERE>
To release the deployment, run the command: kubectl apply -f deployment.yaml.
Application Load Balancer
Expose a service in your AKS cluster to receive incoming traffic and direct it to your Relay server.
# service.yaml

apiVersion: v1
kind: Service
metadata:
  name: azure-mte-relay-service
spec:
  type: LoadBalancer
  selector:
    app: azure-mte-relay
  ports:
    - protocol: TCP
      port: 80
      targetPort: 8080
Run the command: kubectl apply -f service.yaml
You may then run the command kubectl get services to get information about the newly created load balancer.
Remove deployment and service
If you need to remove the deployment and service you may run the command: kubectl delete -f deployment.yaml && kubectl delete -f service.yaml
MTE Relay Client-Side Setup
Eclypses provides several packages and techniques for client applications to interface with MTE Relay server:
Testing
Once the Relay Server is configured:
- To test that the API Service is active and running, submit an HTTP Get request to the echo route:
- curl 'https://[your_domain]/api/mte-echo'
- Successful response:
{
  "echo": true,
  "time": [time_stamp]
}
Troubleshooting
Most problems can be determined by consulting the logs. Some common problems that might occur are:
- Invalid Configuration
- Network misconfiguration
Some specific error examples include:
- I cannot reach my relay server.
- Double check your Security Group allows traffic from your load balancer.
- Check CloudWatch
- Server exits with a
ZodError- This is a config validation error. Look at the "path" property to determine which of the required Environment Variables you did not set. For example, if the path property shows "upstream," then you forgot to set the environment variable "UPSTREAM."
- Server cannot reach Redis.
- Check that Redis is started in same VPC.
- If using credentials, check that credentials are correct.
MTE Relay Server includes a Debug flag, which you can enable by setting the environment variable "DEBUG" to true. This will enable additional logging that you can review in CloudWatch to determine the source of any issues.
Health Check
For short and long-term health monitor logs.
Echo Route
The Echo route can be called by an automated system to determine if the service is still running. To test that the API Service is active and running, submit an HTTPGet request to the echo route:
curl 'https://[your\_domain]/api/mte-echo/test'
Successful response:
  {
    "echo": "test",
    "time": [time_stamp]
  }
Performance Metrics
100 concurrent connections, 5 minute duration, 1kb request and response
| # Requests | Req/second | Median Response Time (ms) | p90 | p99 | |
|---|---|---|---|---|---|
| Control API | 28050 | 94 | 52 | 59 | 87 |
| MTE Relay | 27763 | 92.6 | 62 | 71 | 87 |
| Result | 98.9% | 98.5% | +10ms | +12ms | +0ms |
200 concurrent connections, 5 minute duration, 1kb request and response
| # Requests | Req/second | Median Response Time (ms) | p90 | p99 | |
|---|---|---|---|---|---|
| Control API | 54938 | 183 | 55 | 66 | 110 |
| MTE Relay | 53724 | 179 | 72 | 110 | 190 |
| Result | 97.8% | 97.8% | +17ms | +44ms | +80ms |
250 concurrent connections, 5 minute duration, 1kb request and response
| # Requests | Req/second | Median Response Time (ms) | p90 | p99 | |
|---|---|---|---|---|---|
| Control API | 67966 | 226 | 55 | 72 | 130 |
| MTE Relay | 64465 | 215 | 100 | 170 | 280 |
| Result | 94.8% | 95.1% | +45ms | +98ms | +150ms |
Note: We recommend load-balancing requests between multiple instances of MTE Relay once you reach this volume of traffic. Please monitor your application carefully.
300 concurrent connections, 5 minute duration, 1kb request and response
| # Requests | Req/second | Median Response Time (ms) | p90 | p99 | |
|---|---|---|---|---|---|
| Control API | 80249 | 267.57 | 58 | 92 | 190 |
| MTE Relay | 67696 | 225.74 | 260 | 350 | 450 |
| Result | 84.3% | 84.3% | +202ms | +258ms | +260ms |
Routine Maintenance
Patches/Updates
Updated images are distributed through the marketplace.
Emergency Maintenance
Handling Fault Conditions
Tips for solving error states:
- Review all tips from Trouble Shooting section above.
- Check Logs for more information
- Configuration mismatch
- Double-check environment variables for errors
How to recover the software
The MTE Relay Container AKS pod can be relaunched. While current client sessions may be affected, the client-side package should seamlessly manage the re-pairing process with the MTE Relay Server and the end-user should not be affected.
Support
The Eclypses support center is available to assist with inquiries about our products from 8:00 am to 8:00 pm MST, Monday through Friday, excluding Eclypses holidays. Our committed team of expert developer support representatives handles all incoming questions directed to the following email address: customer_support@eclypses.com